In many cases, I have seen customer struggling with “Standard Mail Merge” functionality. I have suggested them to either use “Drawloop“ or “Conga Composer“ however these applications are paid.
Before going ahead let’s see the drawbacks of “Standard Mail Merge”:
- It runs on Client side and needs ActiveX Control
- It needs Internet Explorer
- It does not work with Office 2010, it works only for Office 2003 and 2007
- Windows 7 is not supported and causes unexpected error many times. It supports Windows XP and Windows Vista only
The solutions to all above problem is “Extended Mail Merge (XMM)” template which is free and native Salesforce solution.
Following are the advantages of “Extended Mail Merge (XMM)”:
- It runs on server side and does not require installation of any ActiveX Control
- It runs on almost al major browsers including firefox, Chrome
- It supportes Office 2007 as well as Office 2010 (document must be saved in a 97-2003 DOC format)
- We can save output into “Document” tab
- XMM can send final word document in email itself
NOTE: Mail Merge & Extended Mail Merge uses same templates: “Setup | Communications Templates | Mail Merge Templates”
There are few limitations in XMM also like:
- At a time, it can merge only 1000 records.
- Template size cannot exceed 1MB of size.
- It will access only those fields for which current user have access, it respects Field level security (FLS)
How to enable “Extended Mail Merge (XMM)” ?
We have to contact Salesforce to enable this feature in our Salesforce Organization.
How to activate “Extended Mail Merge (XMM)” , once it is enabled by Salesforce?
Navigate to “Setup | Customize | User Interface” and select checkbox “Activate Extended Mail Merge”. We can also select to save XMM result in Document tab as shown in below snap.


Before using XMM , we have to create template in Microsoft Word. So, lets see how to create template.
For this article, let’s say our template is going to be used by “Contact” object and content should be as simple as :
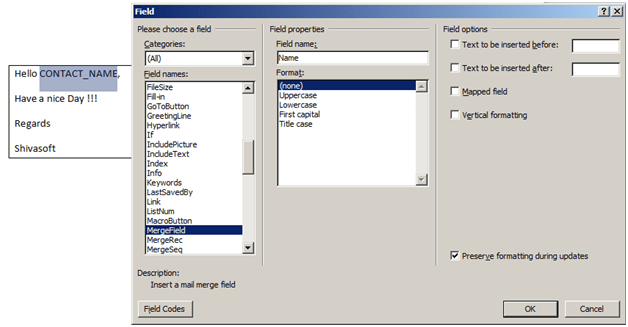
Hello «Contact_FirstName»,
Phone Number - «Contact_Phone»
Regards
Shivasoft
In above paragraph, “CONTACT_Name” needs to be replaced by actual contact name. For this, we need API name of that field from Salesforce which is “Name”. Now create above template in Microsoft word and place the cursor where we want value to be appeared and navigate to “Insert | Quick Parts | Fields”.
New window will appear, select MergeField and enter API Name as shown in below image.
Note : While entering API name of any field, It should be prefixed by Object name and Underscore . For Example, API Name in Contact Should be referred as Contact_Name. (Object_FieldAPIName) .
Now, go to Salesforce and navigate to “Set up | Communication Templates | Mail Merge Templates” and Upload recently created template.
Now to check that whether template is working or not. Navigate to Contact Tab and select “Mass Mail Merge” link present at bottom.
Step 1:
Select List of Contacts for which you want to run “Mail Merge” template.
Step 2:
Select Document Types to Generate. The Supported document types are documents, envelopes and labels. You can also select if you want to Log an activity that mail merge documents were generated for those records.
Step 3:
Select Document templates to be used by “Mass Mail Merge” which we have created in this article. In this step we can select that all documents to be generated in single word document or we have to create separate word files.
Once we click on finish button, we will get messag that email will be sent to email id once document is generated.

Point to Remember:
- Prefix the field label with the type of record. For example, “Account_MarketCap” for an account field named MarketCap.
- Convert all spaces to underscores. For example, a custom opportunity field named “Product ID” becomes “Opportunity_Product_ID”.
References:
Mail Merge Documentation
Leave a Reply